Claim Expense Overview
The Claim Expense page in DocView Web allows users to view, manage, and interact with all their expense claims.
This page is accessed by clicking Claim Expense from the Scan Expense sidebar menu.
It provides a centralized dashboard for tracking claim status, reviewing details, editing claims, and submitting new claims.
Navigation
Login to DocView Web
- Enter your email and password on the login page.
- Click Login to access the main dashboard.
Open the Sidebar Menu
- Click the ☰ Sidebar Icon at the top-left corner of the screen to expand the navigation panel.
Select "Scan Expense"
- From the sidebar menu, click Scan Expense.
- The system displays three sub-menu items:
- Claim Expense
- Manage Expense
- Pay Expense
Open Claim Expense Page
- Click Claim Expense to open the page that displays all your claims and their details.
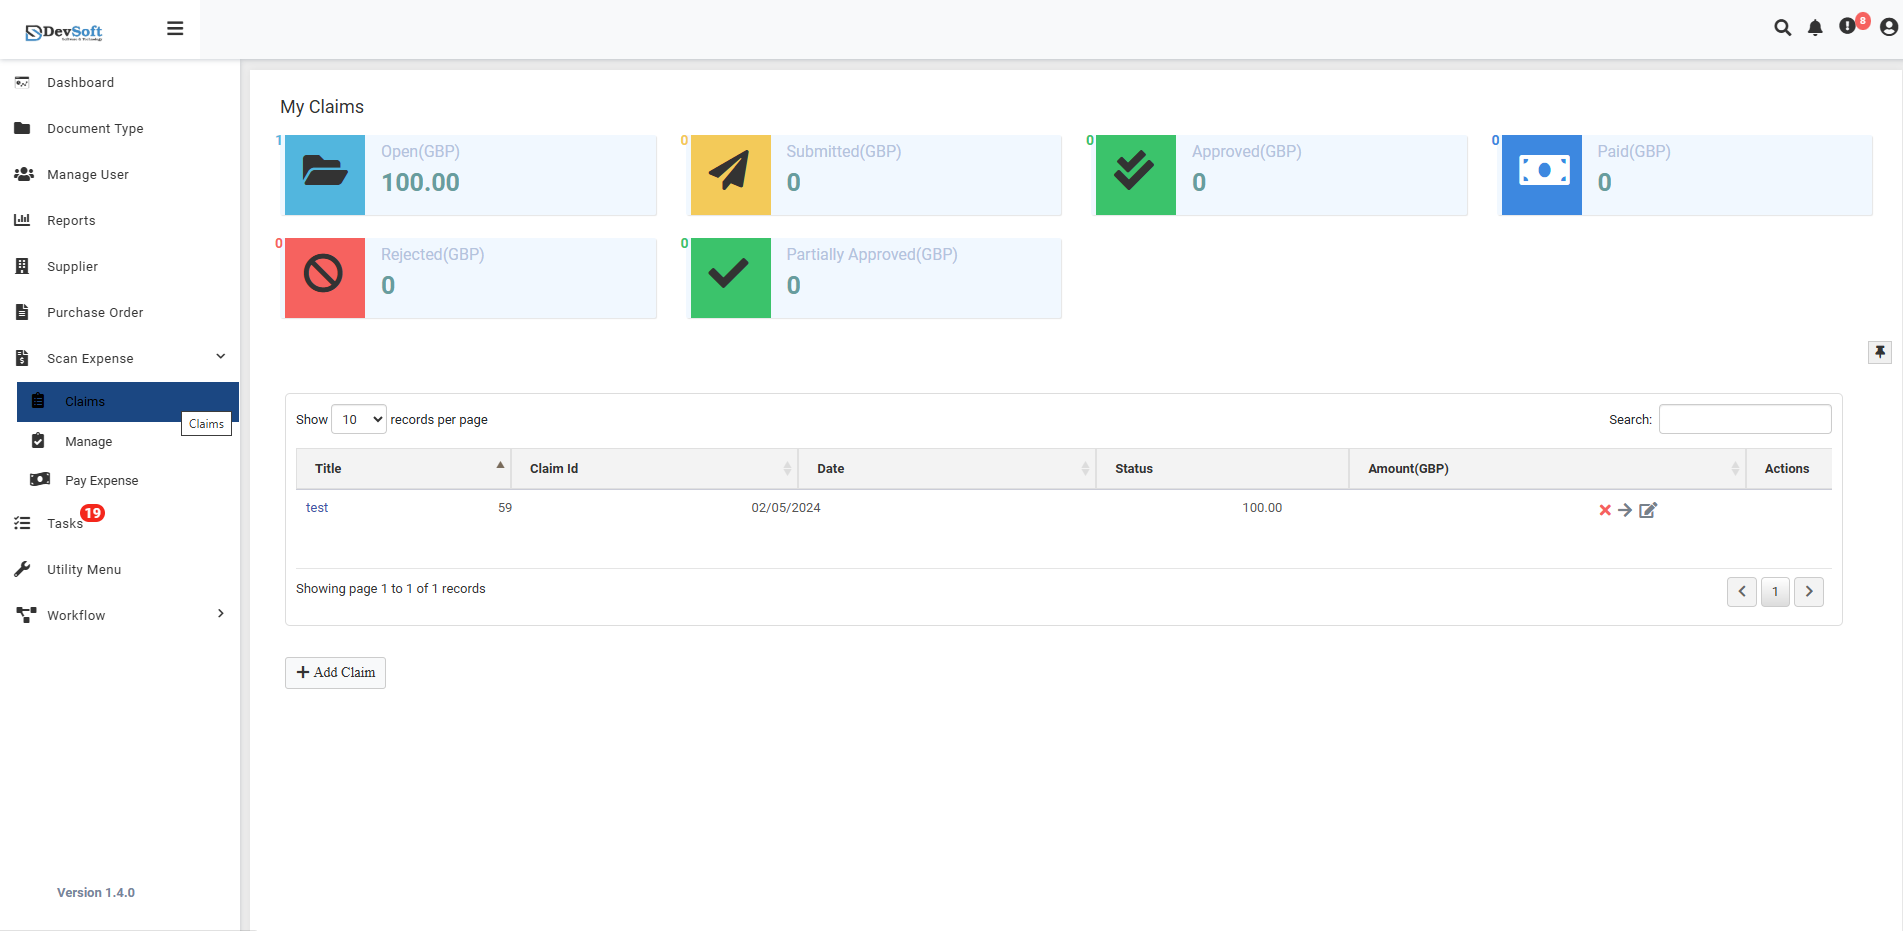
My Claims Section
The My Claims section at the top provides a summary of all your claims:
- Open (GBP) – Total value of claims pending or not yet approved.
- Submitted (GBP) – Claims that have been submitted and are awaiting approval.
- Approved (GBP) – Claims that have been fully approved.
- Paid (GBP) – Claims for which payment has been processed.
- Rejected (GBP) – Claims that were rejected.
- Partially Approved (GBP) – Claims that received partial approval from approvers.
This summary allows users to quickly understand the status and progress of all claims at a glance.
Claim Expenses List
The main list shows all expense claims in a grid view, with the following details:
- Title – Description or purpose of the claim (e.g., "Client Meeting – London").
- Claim ID – Unique identifier for each claim.
- Date – Date when the claim was created.
- Status – Approval status (Pending, Approved, Partially Approved, or Rejected).
- Amount (GBP) – Total value of the claim.
- Actions – Icons for performing operations on each claim.
Action Icons
Each claim in the list has three main action icons. Clicking an icon navigates the user to the corresponding page or performs the action.
1. View Claim
- Action: Click the View Claim icon on a claim row.
- Result: Opens the View Claim page, showing full details of the selected claim.
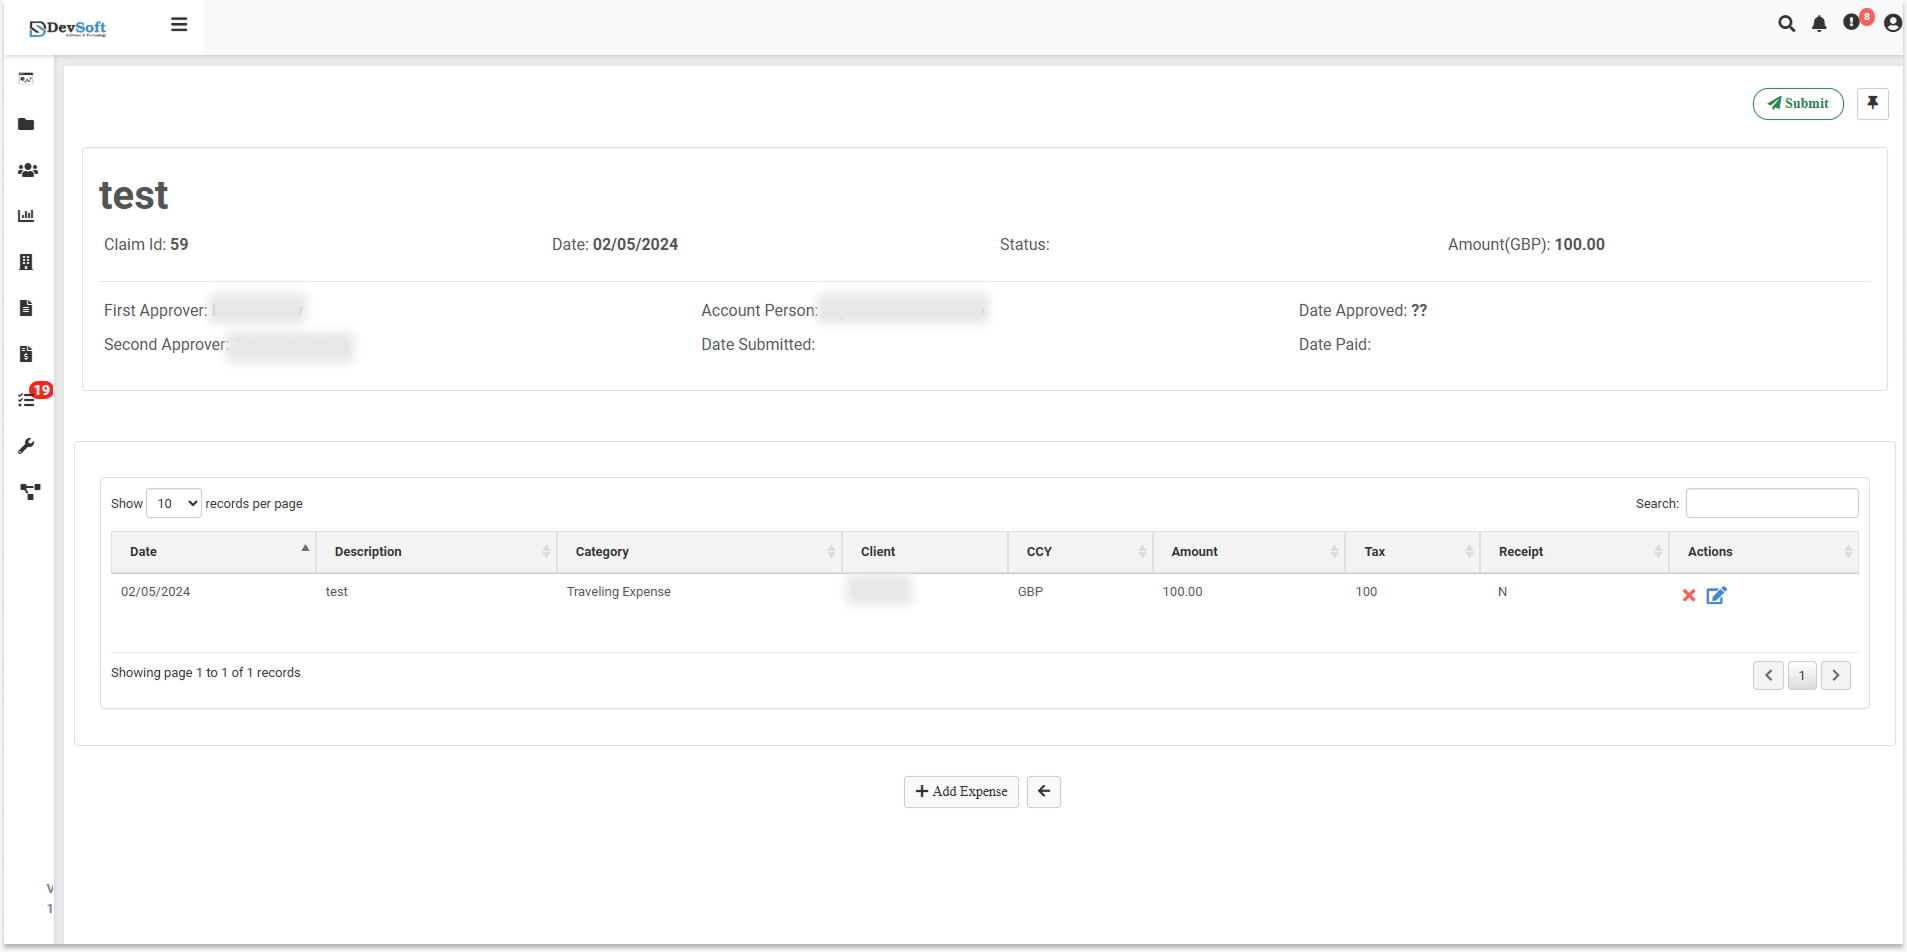
View Claim Page Contents
Claim Header Information:
- Claim ID - Unique identifier for the claim
- Date - When the claim was created
- Status - Current approval status
- Amount (GBP) - Total claim value
Expense Line Items Section:
Top Right Action Buttons:
- Search Button - Search and filter specific expense line items
- Submit Icon - Submit the entire claim for approval
- Split Icon - Split expense items into separate claims
Main Components:
- Grid View - All individual expense entries in table format
- Add Expense Button - + Add Expense button to add new line items
- Pagination Controls - Navigate through multiple expense entries
Expense Line Items Grid Columns:
- Date - When the expense was incurred
- Description - Details of the expense (e.g., "Test")
- Category - Expense classification (e.g., "Traveling Expense")
- Client - Client or project associated with the expense
- Currency - Currency type (e.g., GBP)
- Amount - Value of the individual expense
- Tax - Tax amount or percentage
- Receipt - Indicates if receipt is attached (Y/N)
- Actions - Edit or remove specific line items
Top Right Action Buttons Details
Search Button:
- Function: Search and filter specific expense line items within the claim
- Features:
- Text search across all expense descriptions
- Filter by date range, amount, or category
- Real-time search results
- Clear filters option
Submit Icon:
- Function: Submit the entire claim for approval workflow
- Process:
- Validates all expense items before submission
- Routes to predefined approvers based on amount and category
- Locks the claim from further edits after submission
- Generates submission confirmation
Split Icon:
- Function: Split expense items into separate claims
- Use Cases:
- Separate expenses for different projects/clients
- Divide large claims into smaller batches
- Create individual claims for specific expense types
- Reorganize expenses for better approval routing
Add Expense Functionality within View Claim
When users click the "+ Add Expense" button on the View Claim page, they can add new expense line items to the existing claim.
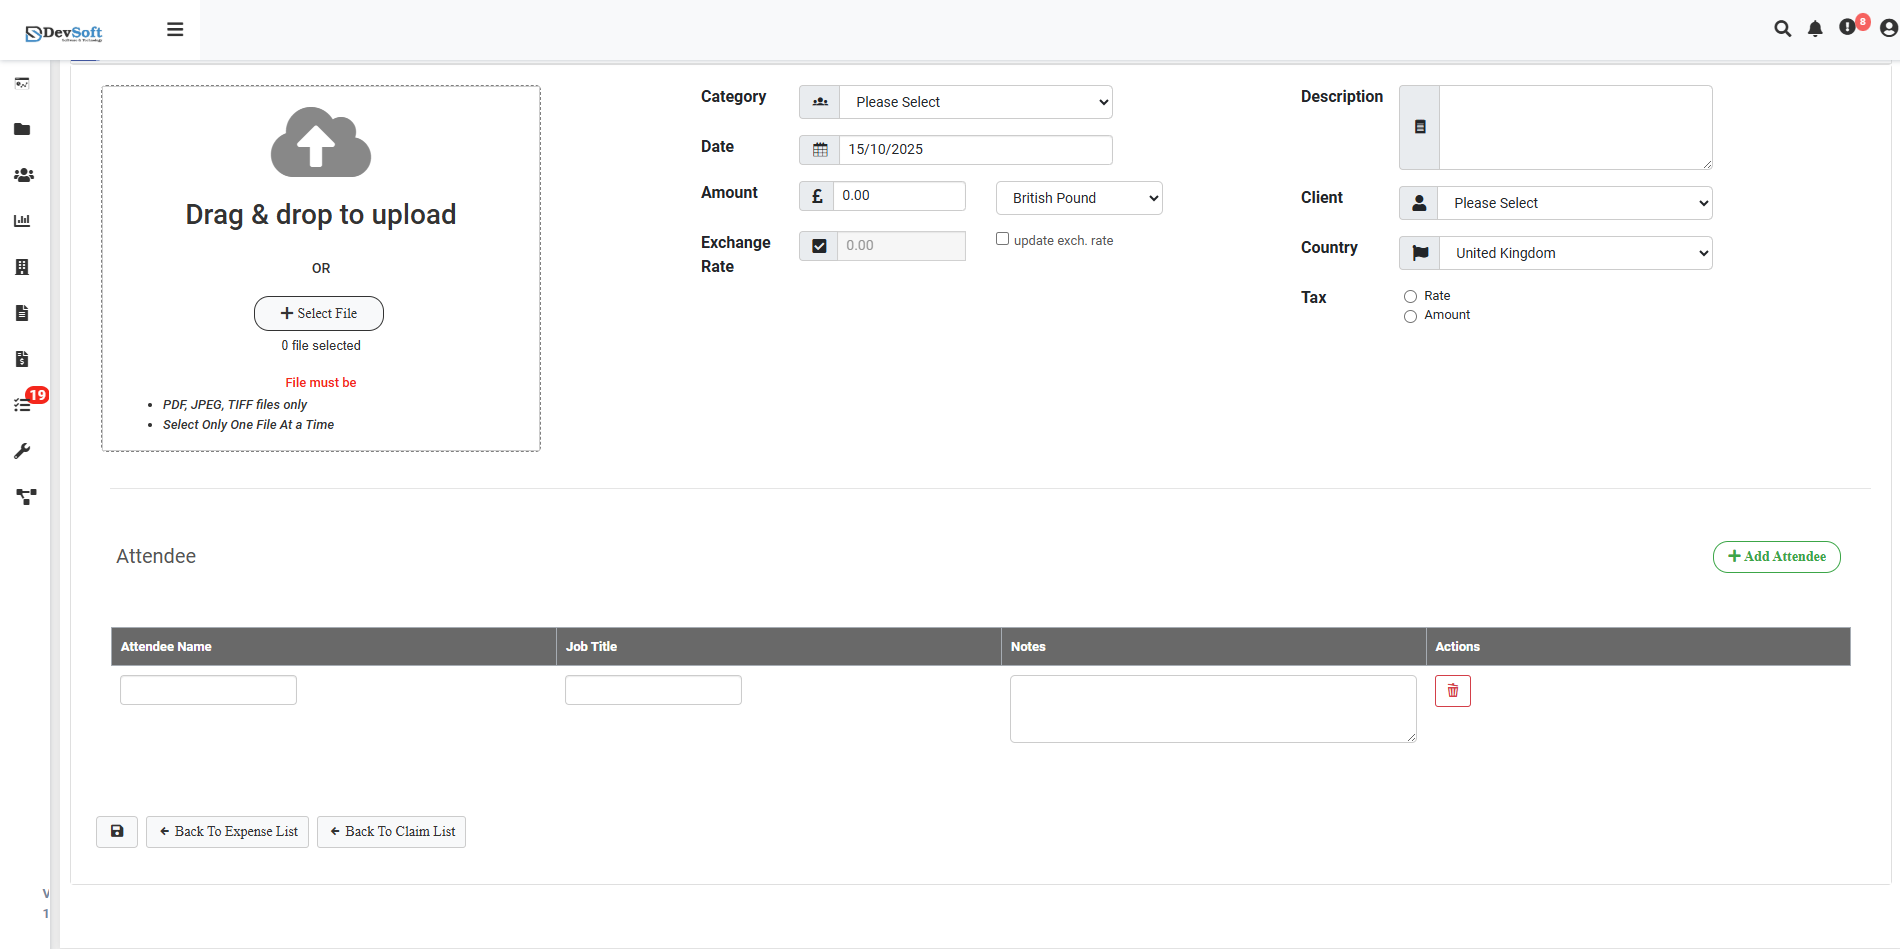
Add Expense Form Features:
File Upload Section:
- Drag & Drop Interface - Direct file upload by dragging receipts
- Select File Button - Traditional file browser for manual selection
- Supported Formats - JPEG, PNG, PDF, TXT files only
- Single File Processing - Process one file at a time per upload
Expense Details:
- Category - Dropdown selection for expense classification
- Date - Calendar picker for expense date
- Amount - Enter the expense amount
- Exchange Rate - Currency conversion rates for foreign expenses
- Description - Details and purpose of the expense
- Client - Associate expense with specific client or project
- Country - Select country where expense occurred
- Tax - Configure tax rates and amounts
Attendee Management:
- Add Attendee - Include multiple attendees for the expense
- Detailed Information - Names, job titles, and additional notes
- Action Controls - Manage attendee list with edit/remove options
Notes: The View Claim page is read-only for most fields, but the Add Expense functionality allows users to add new line items to existing claims.
Flow
- User clicks View Claim icon from main list →
- View Claim page opens showing all claim details →
- User uses Search to find specific expenses if needed →
- User clicks "+ Add Expense" button to add new items →
- Add Expense form appears/opens →
- User fills expense details (Category, Date, Amount, Exchange Rate, Description, Client, Country, Tax) →
- User clicks Save to add the new expense line item →
- Returns to View Claim page with new expense listed in the grid →
- User clicks Submit to send claim for approval or Split to reorganize expenses
2. Edit Claim
- Action: Click the Edit Claim icon on a claim row.
- Result: Opens the Edit Claim page, allowing modification of claim details.
Flow:
- User clicks Edit Claim icon →
- Edit Claim page opens →
- User edits claim details →
- User clicks Save Draft or Submit Claim →
- Returns to the Claim Expense list
3. Delete Claim
- Action: Click the Delete Claim icon on a claim row.
- Result: Removes a claim from the system.
Typical Workflow
- Click Add Claim to start a new claim submission.
- Fill in claim details and attach scanned receipts.
- Use Search to review specific expenses if needed.
- Click Submit to send for approval or Split to reorganize claims.
- Monitor the claim's progress via the Status column.
- Click View Claim to review full details.
- Within View Claim, click "+ Add Expense" to include additional line items.
- Click Edit Claim to make changes to claim details.
- Click Delete Claim to remove an unsubmitted claim.
Page Controls
- Add Claim – Opens the form to create a new expense claim.
- Filter/Search – Locate claims quickly by Title, Date, Status, or Amount.
- Export – Download claim data in Excel or PDF format for reporting purposes.
- Records Per Page – Adjust the number of claims displayed in the list.
- Pagination – Navigate through multiple pages of claims.
Note: The Search, Submit, and Split functions are available in the View Claim page's top right corner and provide essential tools for managing expense line items before final submission.